
Garage door sensor repair often begins with three safe checks: remove anything blocking the doorway, clean both photo-eye lenses, and confirm that the sensors face each other. If the door still reverses, an indicator light flickers, or the wiring or brackets are damaged, the system needs professional diagnosis. Never bypass the sensors to force the door closed.
Safety sensors are part of the opener’s entrapment-protection system. A problem can prevent the door from closing, make it reverse unexpectedly, or produce an error pattern on the opener. This guide explains what Arizona homeowners can inspect safely and when to use our garage door safety sensor repair and alignment service.
How Safety Sensors Work
| What You Notice | Possible Category | Safe Next Step |
|---|---|---|
| Door starts down, then reverses | Blocked or weak beam | Clear the opening and clean lenses |
| One indicator flickers or is off | Alignment, power, or wiring | Check the manual; inspect without opening wiring |
| Problem returns after adjustment | Loose bracket, vibration, or damaged wire | Schedule diagnosis |
| Door reverses with steady sensor lights | Door travel or opener issue | Stop repeated tests and inspect the full system |
Most residential garage door openers use two photo-eye sensors near the bottom of the opening. One sends an invisible beam across the doorway and the other receives it. When an object interrupts that beam during closing, the opener should stop and reverse the door.
The U.S. Consumer Product Safety Commission explains that garage door openers should have an electric eye or similar sensor that automatically reverses a closing door when someone enters its path. That makes the sensors a safety device, not an optional convenience.
A closing problem is not always a sensor failure. A door that binds in its tracks, has damaged rollers, or is improperly balanced can also trigger a reversal. The opener may be responding to excess resistance rather than a broken beam.
Signs of Misaligned Sensors
Misaligned sensors commonly cause a door to refuse to close normally, reverse shortly after moving downward, or display a sensor-related error. The exact indicator behavior depends on the opener’s make and model.
- The door begins closing and immediately returns to the open position.
- The door will not close from the remote but behaves differently when the wall control is held.
- One sensor indicator is off, flickering, or changes when the bracket is touched.
- The sensors do not appear to face each other at the same height.
- The problem started after a stored item, broom, bicycle, or vehicle contacted a bracket.
- The door works at some times of day but fails when direct sunlight reaches one sensor.
These signs narrow the search, but they do not prove alignment is the only problem. A cut or pinched low-voltage wire, a failed sensor, a loose terminal at the opener, or an issue with the garage door opener can produce similar behavior.
Do not place a person, pet, or valuable object under the door for testing. Keep the opening clear and follow the reversal-test method in the opener’s manual. If the door is crooked, off track, hanging from one cable, or moving unpredictably, stop operating it and use professional emergency garage door repair.
How to Realign Them
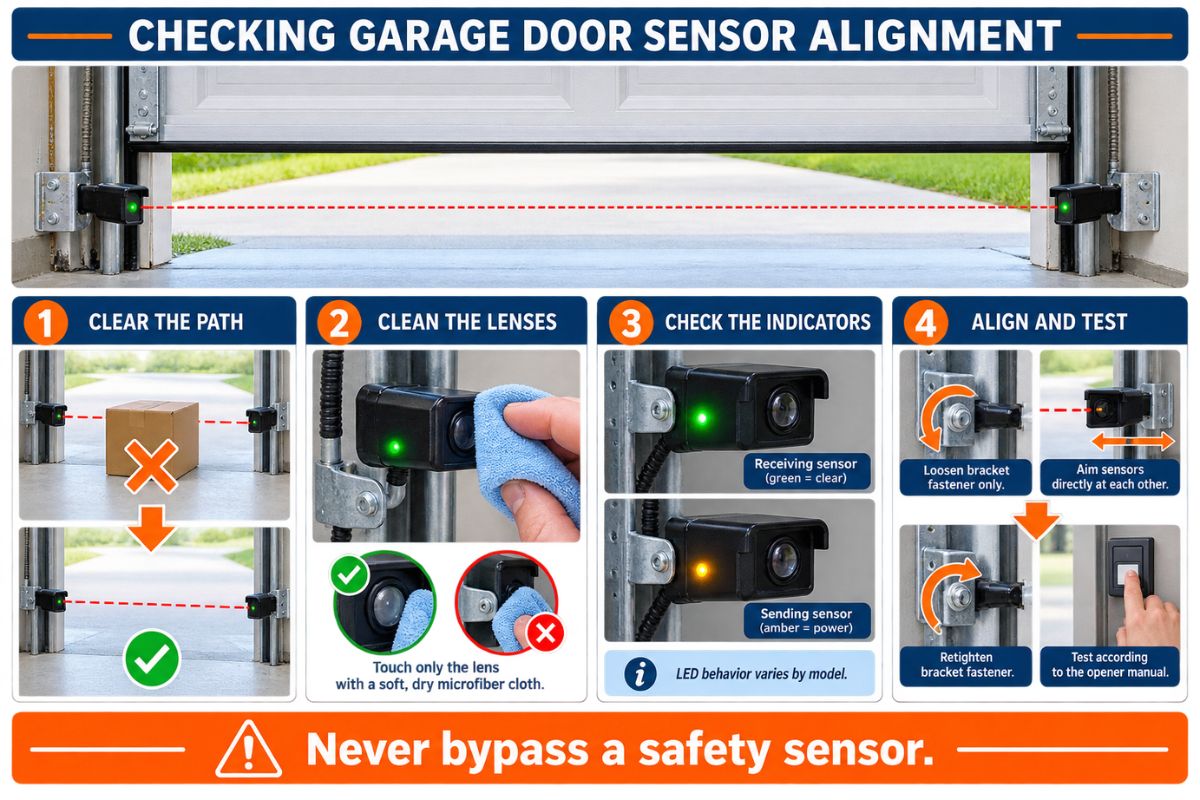
Homeowners can safely clear the beam path, clean the sensor faces, visually compare their positions, and make a small bracket adjustment when the hardware is intact. Disconnect opener power before touching a bracket or nearby wiring, and follow the manufacturer’s manual for your model.
Clean the Lenses
Dust is a frequent cause of weak or interrupted signals near an Arizona garage floor. Cleaning is the least invasive first step.
- Open the garage door fully and keep people, pets, and objects away from the opening.
- Disconnect power to the opener according to its manual.
- Remove boxes, tools, webs, leaves, and other objects from the beam path.
- Wipe each lens gently with a clean, soft, dry microfiber cloth.
- Do not spray cleaner directly onto the sensor or saturate its housing.
- Restore power and observe the indicators without placing anything beneath the door.
A lens may look clean while still carrying a fine dust film. Clean both sides even when only one indicator shows a problem. If the lens is deeply scratched, the housing is cracked, or moisture is visible inside it, cleaning will not repair the component.
Adjust the Brackets
Only adjust an intact, accessible sensor bracket. Do not bend track hardware, disturb door cables, or loosen the bottom fixture that anchors a lift cable.
- Compare the height and angle of both photo eyes.
- Confirm that their faces point directly toward one another.
- Check the manual for the normal LED pattern for your exact opener.
- If the sensor uses a simple adjustable bracket, loosen only its bracket fastener enough to reposition the photo eye.
- Aim the sensor until the model-specific indicator shows stable alignment.
- Hold the sensor steady while retightening the fastener.
- Test the reversal system exactly as directed by the manufacturer.
If the light changes when the wire moves, the problem may be electrical rather than optical. Do not open wire connections unless the manufacturer specifically identifies a homeowner-safe procedure. Contact our Garage Door AZ service team for testing.
When Sensors Need Replacing
Replacement becomes more likely when cleaning and stable alignment do not restore operation, or when inspection finds physical or electrical damage. Diagnosis should confirm compatibility before parts are ordered.
Replacement indicators
- Cracked housing or lens
- Moisture or corrosion inside the sensor
- Broken bracket that will not hold alignment
- Damaged, pinched, or repeatedly intermittent low-voltage wiring
- No model-correct indicator response despite confirmed power and wiring
- A sensor pair that is incompatible with the installed opener
Sensors should be matched to the opener manufacturer’s requirements. Similar-looking photo eyes are not automatically interchangeable. A technician can identify the opener model, evaluate the circuit, verify wiring continuity, and determine whether the sensor pair, bracket, wire, or opener board is responsible.
Replacement also may not solve a door-travel problem. If the opener reverses because the door binds, sensor replacement can leave the original symptom unchanged. That is why a complete visit may include door balance, track condition, rollers, limits, and opener operation. LiftMaster’s official maintenance guidance likewise lists sensor alignment, track alignment, obstructions, and broken springs as separate possible causes of opener trouble.
Sensor Repair in Arizona
Arizona conditions can make minor sensor weaknesses more noticeable. Dust accumulates close to the floor, stored items can shift into the beam path, and vibration can loosen a marginal bracket. Direct sunlight may also affect some systems at certain angles.
A practical Arizona maintenance routine is simple: keep the floor zone clear, clean the lenses periodically with a dry microfiber cloth, watch for loose brackets, and note whether failures follow wind, cleaning, impact, or a particular time of day. Include sensor testing during a broader garage door maintenance and tune-up.
Professional garage door sensor repair should identify the actual failure rather than automatically replace parts. Garage Door AZ LLC can check alignment, mounting, compatible components, low-voltage wiring, opener response, and door travel. Our Arizona contractor license is ROC 351695. Review our company information or browse the full residential garage door service section.
Frequently Asked Questions — Garage Door Sensors
Schedule Garage Door Sensor Repair in Arizona
If safe cleaning and a minor bracket correction do not restore dependable operation, stop repeating close cycles. Garage Door AZ can diagnose the sensor pair, mounting, wiring, opener response, and door travel before recommending repair or replacement. Call (480) 530-7131, use our contact page, or view our Google Business profile to request garage door sensor repair in the Phoenix metro area.